BrushCue now has twelve new hands-on editing tools. Six are retouching brushes that change only the parts of a photo you paint over. Four draw shapes and arrows on an image, and two crop it. They all run in your browser and export at full resolution.
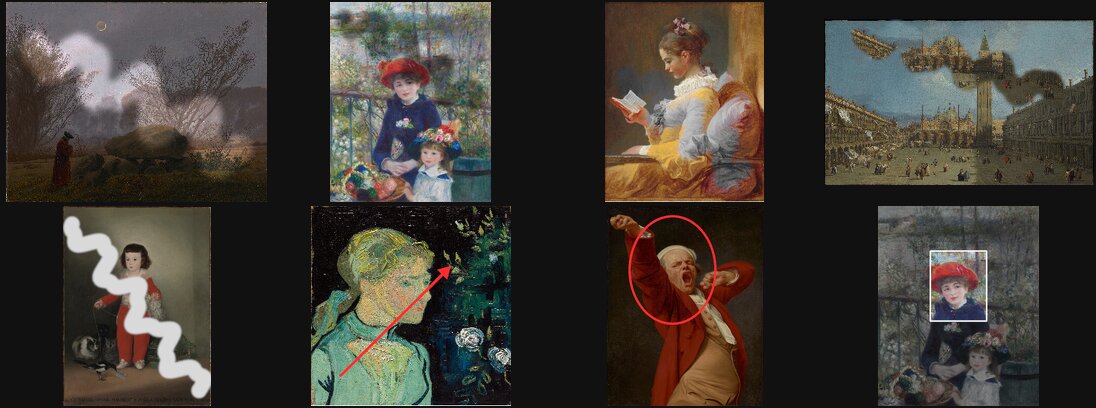
Retouching brushes
Each brush works the same way. Upload an image, paint over the area you want to change, then adjust the sliders. Edge Softness feathers the edge of your strokes so the change blends into the rest of the photo. Turn it down for a hard edge or up for a gradual one.
Dodge Tool
The Dodge Tool lightens only the areas you paint. The name comes from the film darkroom, where photographers "dodged" part of a print by blocking light from it, which left that part lighter. Use it to lift a shadowed face, brighten eyes, or pull a subject out of a dark background.
Lighten Amount is measured in stops of exposure, like a camera. Each stop doubles the light in the painted area. The adjustment happens in linear light, so highlights brighten naturally instead of turning gray.
Burn Tool
The Burn Tool is the opposite of dodge: it darkens the areas you paint. Use it to tame a blown-out sky, deepen a background, or tone down a distracting bright spot. Dodging and burning together is a classic way to shape the light in a photo by hand.
Sponge Tool
The Sponge Tool changes color intensity where you paint. By default it fades color toward gray, which is handy for muting a distracting object or a color cast. Set Saturation to 0 for pure gray, or above 1 to make colors richer instead. It scales chroma in the OkLab color space, so brightness stays the same while the color changes.
Sharpen Part of Image
Sharpening a whole photo can make skin and skies look gritty. Sharpen Part of Image applies sharpening only where you paint, such as eyes, text, or product details. Sharpen Radius sets the size of the edges that get enhanced, and Sharpen Strength sets how much.
Clone Stamp
The Clone Stamp covers what you paint with pixels from another part of the same image. Use Source Offset X and Source Offset Y to choose where the copied pixels come from, measured as a fraction of the image's width and height. To hide a small object, point the offset at a clean patch of sky, grass, or wall next to it, then paint over the object.
Erase Part of Image
Erase Part of Image turns whatever you paint transparent. Export as PNG or WebP to keep the transparent areas; JPEG has no transparency, so erased areas would turn solid. To remove a whole background automatically, start with the Background Remover and clean up the edges here.
Shapes and arrows
The shape tools put a clean outline or solid shape on top of your image, which is useful for screenshots, tutorials, and pointing things out. Each one has a Color picker, a Filled toggle, and a Line Width slider. Line width is a percentage of the image's shorter side, so a setting looks about the same on a small screenshot and a large photo.
Draw Arrow on Image
Draw Arrow on Image draws a straight line from a start point to an end point. With Arrow Head on, it points at the end position, and the arrowhead grows with the line width. Turn it off for a plain line.
Draw Circle on Image
Draw Circle on Image is the quickest way to circle something in a photo. Set different Width and Height values for an oval, and use Rotation to tilt it.
Draw Rectangle on Image
Draw Rectangle on Image frames part of an image with a box. With Filled on, it covers the area with a solid block of color instead.
Draw Polygon on Image
Draw Polygon on Image draws any regular polygon from a triangle (3 Sides) up to a dodecagon (12). Size sets the distance from the center to each corner.
Cropping
Crop Image
Crop Image trims an image to any rectangle. Move the Left, Top, Right, and Bottom sliders to place each edge of the crop. Cropping only removes pixels, so the part you keep is unchanged. For an exact aspect ratio, use Square Crop, Crop 16:9, or Crop 4:5.
Oval Crop
Oval Crop cuts an image into an ellipse with a transparent background around it, which works well for portraits and badges. Adjust its center, Width, and Height, then export as PNG. For a perfect circle, use Circle Crop.