We've added nine new effects to BrushCue: three blurs, a classic sharpening tool, two print and mosaic looks, an inked illustration filter, and two distortions. This post shows what each one does and how it works under the hood.
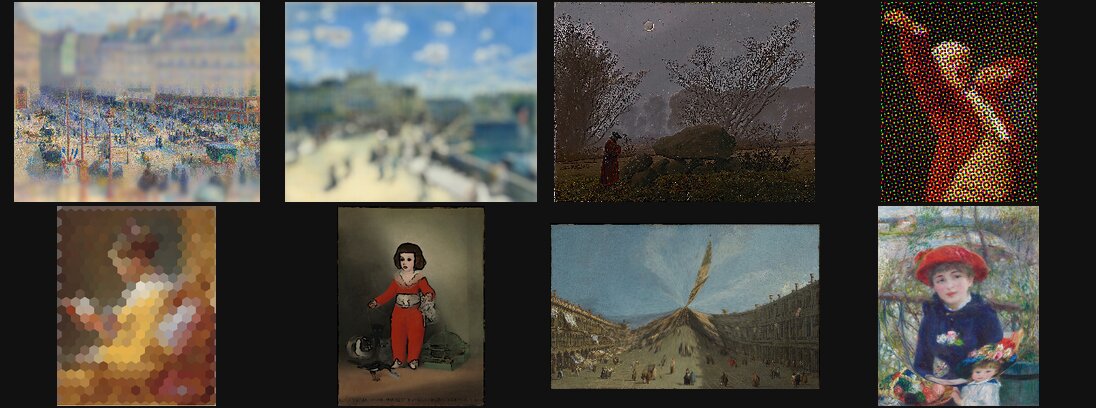
Blurs
Tilt Shift
Tilt Shift makes real scenes look like miniature models. A real tilt-shift lens tilts the plane of focus, so only a thin band of the scene is sharp. That is how we see small objects up close, which is why the effect reads as "tiny."
The tool blurs a copy of your image, then mixes between the sharp and blurred versions based on each pixel's distance from a horizontal focus band. Focus Position and Focus Width place the sharp band, and Transition controls how gradually the blur fades in. A saturation boost adds the bright, toy-like color that sells the look.
let d = abs(position.y - center_y);
let amount = smoothstep(half_band, half_band + ramp, d);
return vec4<f32>(mix(sharp.rgb, blurred.rgb, amount), sharp.a);
It works best on scenes shot from above at a distance, such as streets, crowds, and towns.
Lens Blur
A Gaussian blur fades smoothly and looks like haze. An out-of-focus camera lens is different: it spreads every point of light into a disk, and bright lights become glowing circles called bokeh. Lens Blur imitates that.
For each pixel, the tool averages samples spread evenly over a disk using a golden-angle spiral. It works in linear light, so bright colors add up the way real light does. Bokeh Highlights gives bright samples more weight, which turns highlights into distinct, glowing disks.
let r = sqrt(t) * blur_radius;
let theta = f32(i) * 2.3999632; // golden angle
let c = sample(position + vec2<f32>(cos(theta), sin(theta)) * r);
let w = 1.0 + highlights * 24.0 * pow(luma, 6.0);
Triangle Blur
Triangle Blur runs a box blur twice. One box blur weights every pixel in the window equally, which can look blocky. Running it twice gives each pixel a weight that falls off in a straight line from the center, like a tent. That is a smooth, fast stand-in for a Gaussian blur.
Sharpening
Unsharp Mask
Despite the name, an Unsharp Mask sharpens. It subtracts a blurred ("unsharp") copy from the original, which leaves only the fine detail and edges. It then adds that detail back, scaled by Amount. Radius sets how large the detail is.
What sets it apart from our Sharpen tool is Threshold. Detail smaller than the threshold is left alone, so smooth areas like skin and sky stay clean while real edges get crisper.
let detail = original.rgb - blurred.rgb;
let magnitude = max(abs(detail.r), max(abs(detail.g), abs(detail.b)));
let gate = smoothstep(threshold, threshold + 0.02, magnitude);
let sharpened = original.rgb + detail * amount * gate;
Print and mosaic
Color Halftone
Printed comics and magazines build color from cyan, magenta, yellow, and black ink dots. Color Halftone recreates that look. It splits each color into those four inks and draws each ink on its own grid of dots. Each grid is rotated to a different angle (15°, 75°, 0°, and 45°), which produces the familiar rosette pattern.
Each dot is sized so that the area it covers matches the amount of ink: a cell that needs 30% cyan gets a cyan dot covering 30% of the cell. Our Halftone tool, by contrast, uses a single color of dots on one grid.
Hexagonal Pixelate
Hexagonal Pixelate is like Pixelate, but with a honeycomb grid instead of squares. Each pixel finds the center of the hexagon it falls in, and the hexagon is filled with the average of seven samples around that center. Hexagons fit together without the strong horizontal and vertical lines of square pixels, so the mosaic looks more organic.
Illustration
Inked Filter
The Inked Filter gives photos a hand-inked look. It finds strong edges with a Sobel filter, the same edge detector behind our Sobel Edge Detection tool, and draws them as dark lines. It lays those lines over a smoothed, slightly richer copy of your photo. Ink Amount decides how faint an edge can be and still get inked, and Line Width sets how thick the strokes are. Unlike the Cartoon Filter, it keeps the photo's natural shading.
Distortions
Both distortions work inside a circle. Radius sets the circle's size, and you can drag its center on the canvas.
Pinch Image
Pinch Image pulls the inside of the circle toward its center. Each output pixel reads from farther out than where it sits, by a factor that is strongest near the center and fades to nothing at the edge of the circle. A negative Pinch Amount reverses the direction and pushes the image outward.
let n = distance_from_center / effect_radius;
let factor = pow(sin(1.5707964 * n), -amount);
Spherize Image
Spherize Image wraps the inside of the circle around a sphere, so the middle bulges toward you like a glass ball. Points near the center are magnified, and points near the edge are compressed. It uses the arcsine of each point's distance from the center, which is how a hemisphere looks when seen from the front. A negative Spherize Amount squeezes the middle inward instead. For a lens-style bulge without a hard edge, try the Fisheye tool.